Wedding Scrapbooks
By Danielle Throneberry with Lisa T’s World
Whether you’ve got your dream-budget for the big day, or you and your fiancée are doing it with the help of Visa, you can have that to-die-for scrapbook that will spend hours open on the coffee table instead of years hidden on the bottom shelf.
 That always-a-bridesmaid… adage may well apply to the scrapbooker as well. Having never been married myself, I’ve had plenty of time to perfect the art of wedding scrapbooks for friends, relatives and sorority sisters. My mom, however, has made it into a full-fledged business, creating scrapbooks and memory quilts for all sorts of occasions. Between the two of us, we thought we’d whip up some advice for all the would-be-scrapbookers out there who face the daunting task of cataloging a bride’s most special day.
It is totally possible to do this project yourself, so that you end up with more than just a run-of-the-mill photo album that hangs out in the back of a closet or on a bottom shelf. And if you are lucky enough to have a scrapbook commissioned for your wedding, you’ll still want to read what we’ve got to say – knowing what suggestions to give and what to ask of a professional scrapbook artist can make a scrapbook go from just another pretty book to your beautiful book.
 First things first, pick a theme
No, not for your wedding – although a Star-Wars-themed wedding does lend itself to using sparkly paper and star stickers.
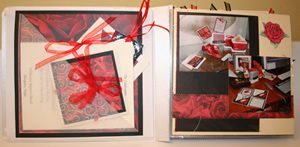
Decide on a palette of colors. If the scrapbook aisle’s stacks of project books are daunting – and who would blame you – try a web-based assistant like this one (www.worqx.com/color/palette.htm), or take a trip to your local Home Depot and take advantage of their paint aisle idea-books to get three or four colors that you’ll carry throughout the whole book.
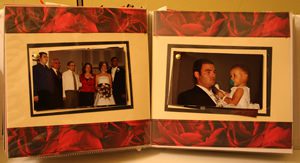
This will create continuity and help to keep you from being overwhelmed at each successive two-page spread. For the example, we completed a commissioned scrapbook this past December, and the mother-of-the-bride requested that we leave out red, black, green and off-white, which matched the colors of the wedding party and the reception decorations.
 Next, separate your pictures into categories
Between the advent of digital cameras and the popularity of placing disposable cameras on tables at the reception, brides are now encountering more pictures from the big day than even snapfish can gracefully handle.
To deal with this, the first plan of attack is to separate all of your pictures into categories: showers, tux/dress fittings, bachelor/bachelorette parties, pre-wedding prep, the walk down the isle, the ceremony, the reception, the throwing of the bouquet/garter, the parents of the bride & groom… the list goes on, but organizing your pictures this way will allow you to make a plan for how many pages you think you’ll need. Don’t worry if you have 25 pictures just of the cake and only one of the ‘you may now kiss the bride’ – you can include all 25 of those cake pictures without spending hours creating a collage, and you can illuminate that one special moment so that an entire page is filled with it.
 Plan your book
Once your pictures are organized, decide on how many two-page layouts you’ll need. The first page and the last page should be left blank for now – they’ll be filled in at the very end. The two-page layouts should be organized visually as one page – that will make your book more reader-friendly and will also allow you to feel less constrained when actually placing your pictures on the page. If you’re feeling really ambitious, you might plan to leave several two-page spreads at the end of the book with no pictures, just blank layouts, to allow the bride and groom to later fill in those pages with pictures from the honeymoon or their first place together.
 And now, the hard part – getting the pictures on the page
Now that you know how many pages you want to devote to each category, create your layouts. Don’t let the pictures completely dictate your layouts – this will just confuse you. Go with one of two guiding thoughts – too many or too few.
For too many pictures, you will want to create layouts with pockets or folds. For too few, you’ll want to rely on geometric shapes, wide background matting and journaling spaces (empty blocks where the wedding party can go back later and write anecdotes or special memories of the events). If you’re completely at a loss for layouts, try googling “simple scrapbook page layout” (or variations of that phrase). About.com has some great examples. But don’t limit yourself to layouts that are labeled ‘scrapbook’. You can take inspiration from the newspaper, magazines and even cereal boxes. Once you’ve created your layout, glue your pictures in place.
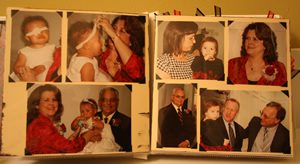
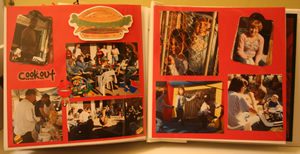
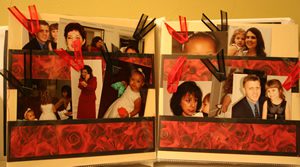
Too many pictures tip: put individual pictures on tags and put them all in a pocket. This makes your scrapbook interactive and allows you to showcase the really great photos while also including the less-than-quality but still-priceless snapshots.
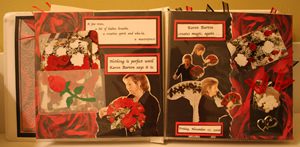
Too few pictures tip: double- or triple-mat your one or two good photos, include some bold geometric shapes, and put some lines in left-over blank space for easy journaling.
 Finishing touches
Embellishments – Once you’ve got your pictures on the page, go back and add embellishments such as stickers, charms, ribbon or glitter.
Doing these last will give you the greatest flexibility for using the embellishments you have and will also keep you from over-doing it. A seasoned eye will always know better when it comes to whether or not to use that last rose sticker!
The first page – this should be your title page. The cover of the scrapbook will ideally be a simple, classic affair – save the couple’s names and wedding date for the first page. This is also where the engagement picture can be placed.
The last page – While the last page can be reserved for a picture of the couple on their honeymoon or the first anniversary, we always leave the last page to be devoted to space for a personal statement by the scrapbooking artist. This can include a picture of the artist with the bride and groom, and a note about why you did the book, why the couple is important to you, or a special memory from the events that you want the couple to remember.
 Final notes
Hopefully we’ve helped to demystify the scrapbooking project for you. If you’re still daunted, here are some websites to help you go forward as you start on your book.
— Creation Station, www.creationstationonline.com, (615-791-9192), located in the Factory at Franklin
— Creative Memories, consultants can be found across the country, and are a great option for the beginning scrapbooker (copy and paste this address for the locals): www.creativememories.com/Find-a-Consultant/Results?zip=37068&mode=ByAddress
CM products all coordinate, and consultants offer classes and parties. We’ve worked with Tatiana Botero before – she lives in Franklin and is awesome!
 — Stampin’ Up, www.stampinup.com/us/enu/default.asp, demonstrators are another great option, especially if you’re looking for something to take your scrapbooking to the next level. Stampin’ Up! offers stamping and scrapbooking supplies that coordinate (their stamping inks match their paper selections!), and there are demonstrators across the country who offer classes and parties.
— The Scrapbook Channel’s list, scrapbookchannel.com/tenn.html – an awesome list of scrapbooking resources in Tennessee!
— Michael’s Arts and Crafts, www.michaels.com, the old standby, Michael’s always has awesome supplies
— Hobby Lobby, www.hobbylobby.com
Danielle Throneberry lives in Green Hills and is in the middle of making another wedding scrapbook that may be the end of her. She is a consultant with Lisa T’s World, which offers custom scrapbook, memory book and memory quilt services. If you’re still afraid to go it on your own after reading this article, Lisa T can help!
Check out Lisa T’s website here!

